Thursday, December 20, 2012

Holiday Round-up!


A Very Merry Round-up - Jelly Shots of Holidays Past! 

OMG. Hello. Happy Holidays. Have missed you all - what a crazy year it's been. I had the best of intentions about getting posts back to weekly this year. As it turned out, they were, what, quarterly? Yikes. There has not been much time for jellies.

I've had some pretty major personal stuff going on, covering every possible aspect of my life, topped off with a career change and a head injury. In a nutshell, the overriding tone of 2012 was "cr@p-tastic cr@p sandwich served in a raging sh!tstorm." (Excuse my language. The descriptors are accurate, however, admittedly not ladylike.) I'm so lucky to have my wonderful, amazing, remarkably tolerant friends and family. And - let's not forget - there's a bright, shiny New Year ahead!

On that note, I was going through the blog archives, and Wow! I was cheered to find lots of super adorable holiday jelly shots ...  I put together a little round up - hope these "Jelly Shots Past of Holidays Past" bring some fun and frolic to your holiday festivities.  (Click below for recipe links!)

I have big jelly shot plans during the holiday break from school - a bunch of new jelly shot concepts in the works, and still want to get the long-awaited Bloody Mary out of testing (you've been so adorable and sweet and patient - and I have the cutest serving idea EVer in mind). And Sobieski vodka kindly sent me a big box of their lovely flavored vodkas earlier this year - will be so much fun to play with!

Something for you to be thankful for - now that I've posted this, you don't have to be greeted by Rumchata Skulls as the most recent post on this blog! Delicious, yes. But not festive AT ALL, although perhaps more suitable for my current demeanor than anything thing merry and/or bright. (BAH HUMBUG. Please send some Christmas Spirit my way!)

And thanks sooooo so much for continuing to visit and read Jelly Shot Test Kitchen blog, and buy the recipe book. It's fun to do something that others enjoy (all over the world - it boggles my mind in the nicest way!) as well as something that brings a little lightheartedness into this crazy world. Putting this post together was a trip down memory lane. Looking at all the photos, well, it's clear that you've all been a big part of my life for years now. Anyway, I appreciate your kindness - you are all the absolute sweetest things - I hope you and yours are enjoying all the best of the season.

XOXOX,

M.

(give them a chance - they're better than the real thing!!!)


(ditto for the 'nog ...)


More »

Sunday, December 25, 2011

Happy Holidays!

More »

Sunday, December 4, 2011

Eggnog Jelly Shots

Eggnog Jelly Shots . . . the vote is split!!! (But we love it so we're posting it . . . )

News Flash!  The holidays are here!!! Oh, wait, all of you probably KNOW THAT ALREADY.  That particular alert is just for me . . .


Well, despite a less than timely start, rest assured that JSTK has lots of fun things planned for your holiday festivities (as well as your yuletide shenanigans)!  First up is a little number also known as a sweet, creamy, delightful, bite of gelatin heaven . . . the Eggnog Jelly Shot.

I first made Eggnog Jelly Shots last year, for the  "Andi Cooks" blog on BettyCrocker.com.  That's when I learned a terrible truth.  (You may want to sit down.  I found this to be quite shocking.)  Eggnog is a love-it-or hate-it substance, much like black licorice and Newt Gingrich.  I love eggnog: in my coffee; in my cocktails; in my IV drip; and most of all, in my jelly shots.

Hope you enjoy.  (And stay tuned, anti-Eggnog-ers . . . more holiday fun to come!)

XO, Michelle


Eggnog Jelly Shots

Suggested pan: Flexible Silicone molds OR a standard 1 lb loaf pan, approximately 4” x 8” (glass or non-reactive metal).  To set the shot as pictured, I used a Bordelais molds, partially filled (the stats on the molds = 2 Oz, 1.77" Dia x 1.77" High, 15 Cavities mold from Kerekes, link)

Ingredients:
  • 1/2 cup water
  • 2 envelopes unflavored gelatin powder
  • 1/2 cup sweetened condensed milk
  • 3/4 cup prepared eggnog (from the carton, or if you have homemade, that's wonderful too)
  • 1/2 cup brandy
  • Chopped red and green maraschino cherries for garnish, if desired (10 each, finely chopped)
If using molds, prepare them by spraying lightly with cooking oil spray, or wiping each mold cavity with a little vegetable oil.  Next, wipe each mold cavity clean with a paper towels.  This will leave the slightest reside which will aid in un-molding the gelatin without affecting the taste or appearance of your jelly shots.  (If you are using a loaf pan, no prep is needed.)

Place the mold on a stable, movable flat surface, such as a cookie sheet or cooling rack before filling with the jelly shot mixture. 

Prepare jelly shot mixture.  Pour water in saucepan and sprinkle with gelatin.  Allow to soak for a minute or two.  Heat over low heat, stirring constantly, until gelatin is fully dissolved (about 5 minutes).  Stir in the sweetened condensed milk.  Remove from heat, and add the egg nog and brandy, stirring to fully incorporate.  

Pour into pan and refrigerate until fully set, several hours or overnight.

To serve, unmold or cut into squares.  

Garnish with finely chopped maraschino cherries, if desired.

Yield: As pictured in molds, 32 jelly shots.  Set in a loaf pan cut into squares, 24 jelly shots


More »

Monday, November 28, 2011

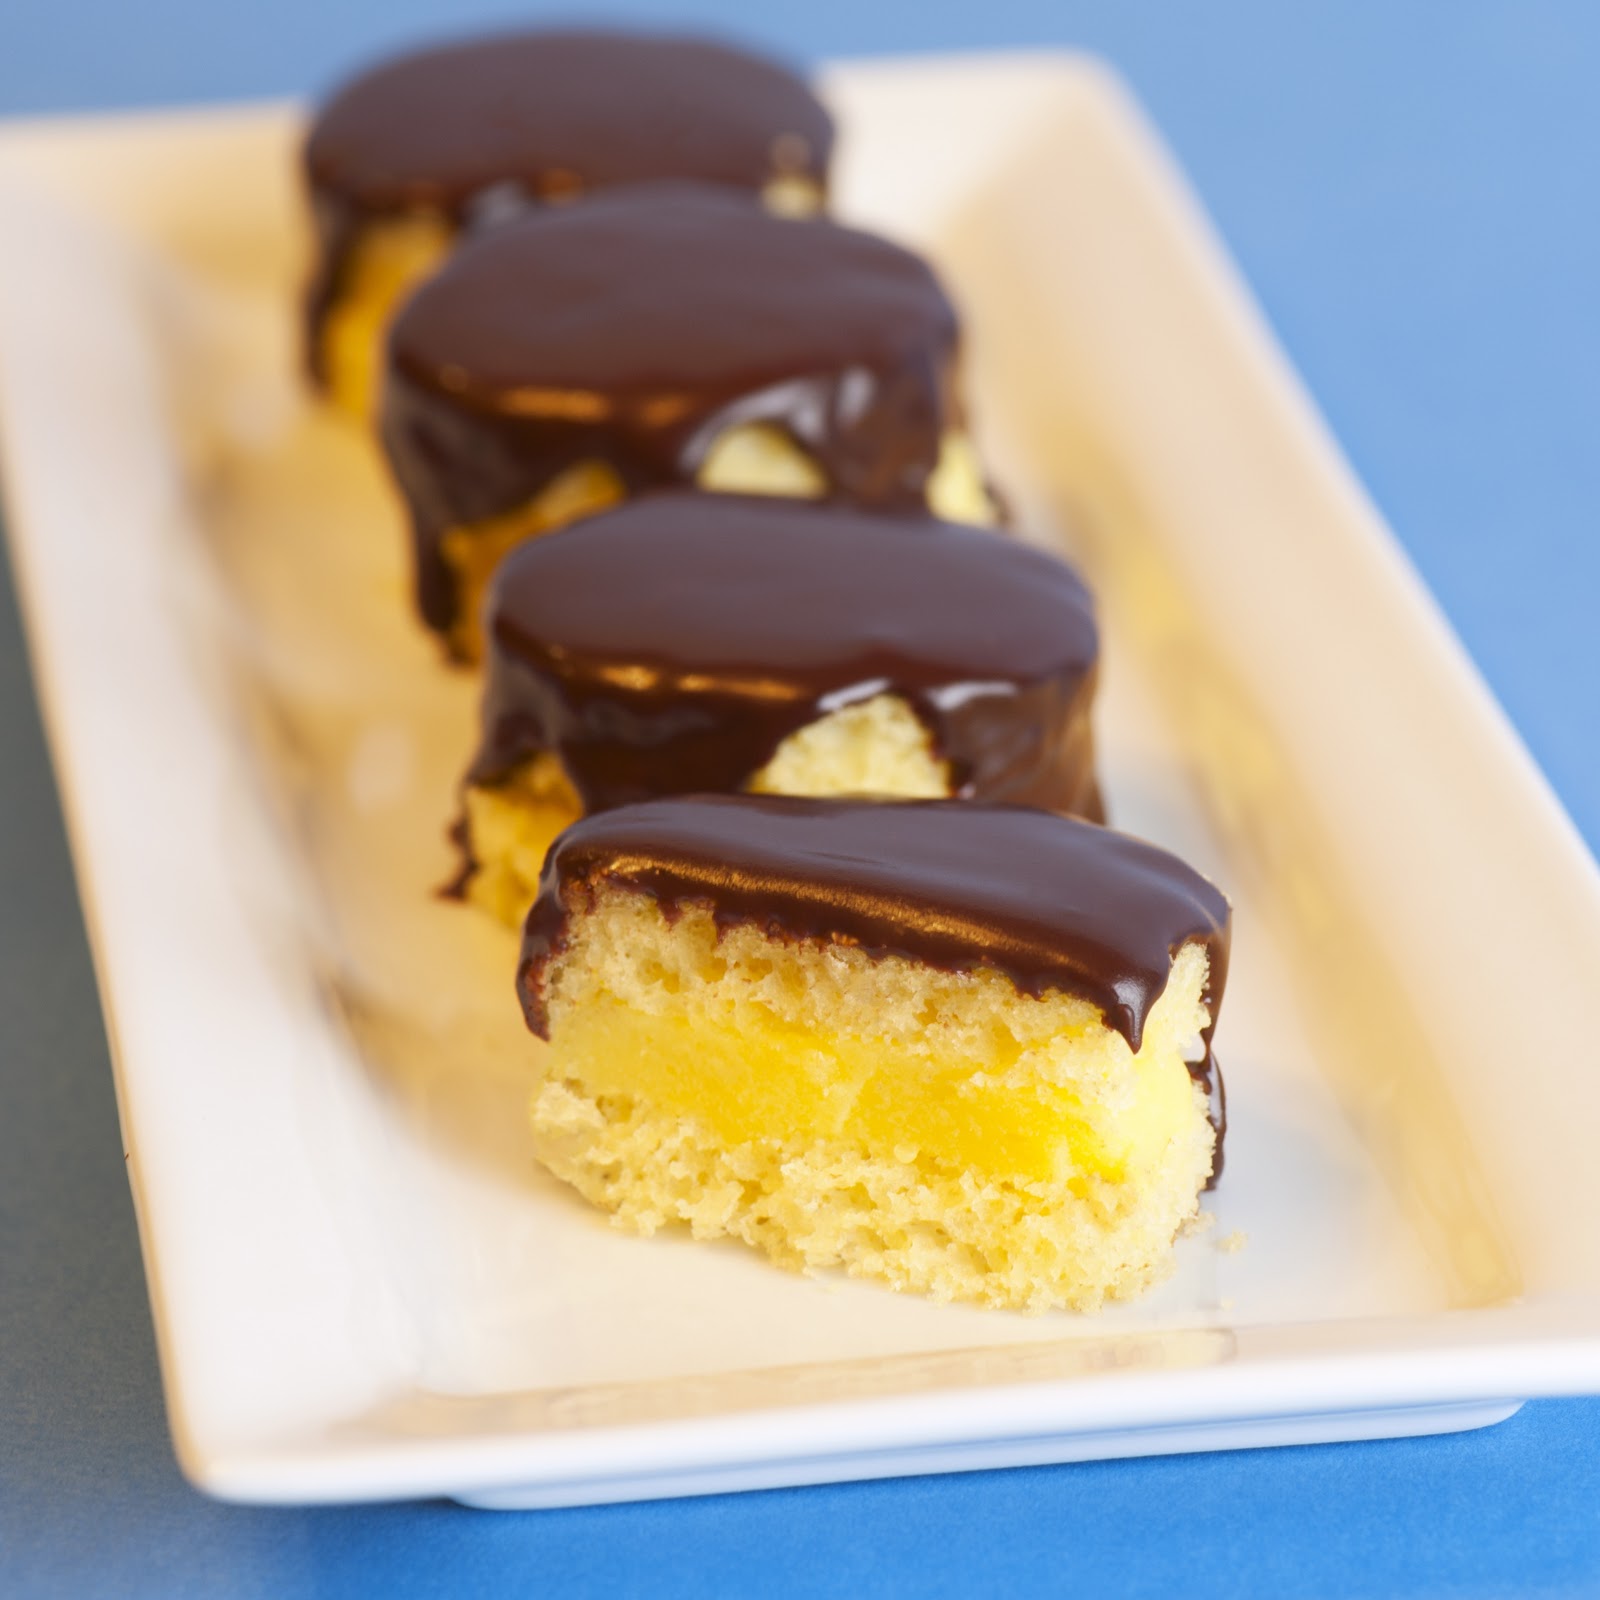
Boozy Boston Cream Pies

new from the Jelly Shot Test Kitchen Team . . .


Boston Cream Pie Jelly Shot - it's a cake, it's a jelly shot,
it's a boozy little bite of dessert-y deliciousness, that's what!!!

Liquor . . . it's not just for gelatin anymore!  With Eat Your Drink™, the Jelly Shot Test Kitchen team is poised to take aim at all the major dessert categories - cake, ice cream, mousse - infusing them with "spirited" fun and frolic! The possibilities are endless!  (You can click on the Eat Your Drink™ section on the right for ready access to these posts.) 
More »

Friday, November 4, 2011

Blueberry-tini Jelly Shots

Blueberry-tini Jelly Shot - fresh and sweet and yum, all in a tiny bite . . .   

Hello all, did you have a nice Halloween?  I am posting this shot of the Blueberry-tini Jelly Shot (last seen as a gruesome trick-or-treat style eyeball) to showcase how pretty and cocktail-party-appropriate this jelly shot really is.  So don't get the wrong idea about our sweet little friend . . . it's more than just another ugly eyeball, er ... face- er . . . oh you know what I mean!

Recipe here . . .

Have a great weekend, and stay tuned for more new recipes soon!

XOXOX Michelle
More »

Monday, October 31, 2011

Someone to Watch Over Me . . .


I always feel like . . . someone's watching me.  
Oh, silly me, it's just a gaggle of Blueberry-tini Jelly Shots!

Happy Halloween everyone!  Yes, I know . . . Eyeballs.  Again.  We did eyeballs last year, yes.  However one of JSTK's wonderful, adorable followers supplied a tip to make them ever so easy - using blueberries as the "pupil" of each eyeball rather than the "cut and paint" method of days gone by.  That, and there's a fab new Blueberry-tini Jelly Shot recipe to share.  So clearly, eyeballs needed another Halloween go!
  (I already am thinking about eyeball method tweaks for next year, so its fair to say that you, my loves, will have eyeball jelly shots in your collective future for some time to come . . .)  

The recipe came together in a snap.  I am inclined to give credit to the energy and enthusiasm of our little testing group, which included Intern Doug (natch!), artist Heidi Henderson (check out Heidi's work here - it's amazing!), and intrepid photojournalist Bob Crippa from Twin Cities' KARE 11.  We also tested a 50/50 mix of lemonade and blueberry vodka, which was really yummy as well - it just had a bit more bite than the final version, which is a little sweeter and more blueberry-y.

So have a sweet and spooky good time tonight!  I hope you get lots of candy and/or whatever other goodies rock your Halloween world  . . .

XOXOX

Michelle

P.S. I'll be posting a "pretty" version of the Blueberry-tini this week as well!  


Blueberry-tini Jelly Shots (ocular style)

Ingredients:
  • 2/3 cup prepared lemonade (strained to remove solids)
  • 2/3 cup lemon lime soda
  • 3 envelopes Knox gelatin (increase to 3 if using molds)
  • 2/3 cup blueberry vodka (we used Stoli)
  • 15 fresh blueberries
  • Food coloring, in desired “eye” colors

First, prepare a half hemisphere silicon mold with a light application of cooking spray.  (Click here for the mold we used!)  Wipe the mold cavities out with a clean paper towel. This method will leave just the slightest residue, which will help unmold the gelatin without affecting the taste or appearance. Place each mold on a cookie sheet or cooling rack to provide a stable surface for handling.

Combine the lemonade and soda in a small saucepan and sprinkle with the gelatin. Allow the gelatin to soak for a minute or two. Heat over low heat, stirring constantly, until gelatin is dissolved, about 5 minutes. (Mixture may be a bit foamy, but this will diminish.) Remove from the heat and stir in the vodka.

Pour 1/2 cup of the gelatin mixture a bowl, and tint as desired with the food coloring - this will form the “irises” of the eyeball jelly shots.  Add 1 teaspoon of the tinted mixture into each mold cavity, and drop a blueberry into each.  Meanwhile, set the un-tinted gelatin aside, covered. 

Refrigerate until the tinted gelatin is set, but slightly sticky to the touch.  Remove the mold from the refrigerator.  Top off the molds with the untinted gelatin.  Return the mold to the refrigerator and chill until the eyeballs are fully set, several hours or overnight.  

To serve, unmold, loosen the edges by pulling away from the side of the mold, and pop each jelly shot out.  
More »

Saturday, October 29, 2011

Vodka Tonic Jelly shots


News flash - a flock of glowing vodka tonic bats is headed your way ! 

We've gone absolutely batty.  Why, you ask?  Well, for starters, these cute little Vodka Tonic Jelly Shot bats would put anyone over the edge!  The best part - no fancy schmancy chemical agents or additives are required for this little trick.  Quinine, the active ingredient in tonic water, naturally glows under black light!  (Oh, the wondrous things one learns on the InterWeb.) 


This photograph was taken offsite, over at Intern Doug's.  Quick survey - let's have a show of hands, please.  How many of you are the least bit surprised that Intern Doug has black lights in his basement?  (Me neither . . . )


I used a Wilton ice cube tray for the bat mold . . . here's the link.  These would be just as groovy set in a pan, and cut into cubes for serving, or set in tiny shot glasses, etc.  The black light is obviously the key component of presentation here!


Enjoy! And XOXOX,

Michelle

P.S. Why, yes, gin would be a lovely substitute for vodka . . . 


Vodka Tonic Jelly Shots

Ingredients:
  • 1 1/3 cups tonic water
  • 1 tablespoon lemon or lime juice
  • 1 tablespoon sugar
  • 3 envelopes plain Knox gelatin (makes a firm jelly shot for setting in a mold.  Decrease to 2 or 2 1/2 envelopes if using other methods to set, such as loaf pan or mini martini glasses.  An envelope of plain Knox gelatin equals about 2 tsp of gelatin powder.)
  • 2/3 cup vodka (citrus flavored is nice . . .)

First, prepare the silicon molds with a light application of cooking spray.  Then wipe the mold cavities out with a clean paper towel. This method will leave just the slightest residue, which will help unmold the gelatin without affecting the taste or appearance. Place each mold on a cookie sheet or cooling rack to provide a stable surface for handling.

Combine the tonic, citrus juice, and sugar in a small saucepan and sprinkle with the gelatin. Allow the gelatin to soak for a minute or two. Heat over low heat, stirring constantly, until gelatin is dissolved, about 5 minutes. (Mixture will be very foamy, but this will diminish.) Remove from the heat and stir in the vodka.

Pour the gelatin mixture into the molds, and refrigerate until fully set, several hours or overnight.
To serve, unmold, loosen the edges by pulling away from the side of the mold, and pop each jelly shot out.


More »

Friday, October 28, 2011

Gumball Jelly Shot


Who's that with the gorgeously ghoulish toothy grin?  Why it's Gumball Jelly Shot, of course!

Happy Halloween-ish weekend everyone!  I'm celebrating with a candy-themed jelly shot and a cheery little skull mold.  Actually, its a silicone ice cube tray - here's the link - manufacturer is Wilton, and it was stocked at my local craft store (and probably is at yours too!).  Link here. . .

The recipe was initially for a Black Gumball Jelly Shot, based on bubblegum vodka a touch of black Sambuca liqueur.  During testing, it came to my attention that a black gumball is a love-it-or-hate-it affair.
So I experimented with other liqueurs - various "pucker" flavors, and a cinnamon.  The recipe worked beautifully, and its fun to have lots of different colors of gumballs, don't you think?  The only caveat is to use a light hand with the liqueurs - you don't want to lose the delicate, Bazooka Joe flavor of the bubble gum vodka!

XO, Michelle

Gumball Cocktail Jelly Shot

  • 1 1/3 cup lemon-lime soda
  • 2 1/2 - 3 envelopes plain Knox gelatin (about 5 tsp to 6 tsp gelatin powder - varies depending on time the jelly shots are expected to sit out before they are consumed.  5 if not that long, 6 if maybe will be out for a while.)
  • 2/3 cup bubble gum flavored vodka
  • 2 tbsp flavored liqueur (I made 4 colors: Sambuca - black; berry pucker - blue; apple pucker - green; and cinnamon - red)

First, prepare the silicon molds with a light application of cooking spray.  Then wipe the mold cavities out with a clean paper towel. This method will leave just the slightest residue, which will help unmold the gelatin without affecting the taste or appearance. Place each mold on a cookie sheet or cooling rack to provide a stable surface for handling.

Pour the soda into a saucepan and sprinkle with the gelatin.  Allow to soak for a minute or two.  Heat over low heat, stirring constantly, until gelatin is dissolved (about 5 minutes).

Remove from heat, and stir in the bubblegum vodka.  (If making several colors, first stir in the bubblegum vodka, then separate into bowls as desired and add stir in the appropriate ratio of liqueurs for each part.)

Pour the gelatin mixture into the molds, and refrigerate until fully set, several hours or overnight.


To serve, unmold, loosen the edges by pulling away from the side of the mold, and just pop each jelly shot out. 
More »

Saturday, October 22, 2011

Candy Corn Jelly Shot Mold


Candy Corn Jelly Shot Mold . . .  sweet mercy . . . so cute, so devour-able!  

Hello!  It's been a while.  Missed you all sooooo much!  Things have been a bit of a whirlwind.  And, unfortunately I accidentally locked Intern Doug in the Test Kitchen pantry on my way out, so he's been indisposed as well.  (Oh, stop - he's absolutely fine - those test kitchen shelves are well stocked to say the least!)  
Assistant Intern James has been AWOL as well, details unknown, apart from his hair being less blue than usual - and I truly don't know if that is a sign of an uptick or a crisis.  However, we are picking up a new intern over the holidays, Intern Max, and am hopeful this will resolve our staffing issues.

Anyway, during my sabbatical, many, many jelly shot thoughts have been thunk about the upcoming Jelly Shot Season, or as it is known in the ROW (rest of world), Halloween.  Last year, we had some fun with cute kid-friendly treats, but this year, I'd love to really do it up right!  Spooky, fun and boozy, that is!  So, in addition to some new recipes, we'll be featuring some twists on old favorites.

We started with a little remix on an old favorite, Candy Corn Jello.  Originally formulated hooch-free, this recipe adapts beautifully to a sweet, flavored vodka.  I would recommend a whipped cream variety (Pinnacle makes a nice one, and I have heard others do as well), as it's probably the closest taste to the tooth-achingly sweet candy inspiration for the jelly shot - but really vanilla, cake flavored, or even a little creme de cacao (clear, please, not the brown tinted!) would be lovely.

Hope you are all well.  I'll be back very soon with a brand new recipe and a bunch of fun remixes!  In the meantime, big, giant, squooshy XOXOX's to you all!

Michelle


Candy Corn Jelly Shot Mold (adult version)

Use a 3 cup mold, or a 9”x9” cake pan for this little guy.  I love a molded jelly shot, its kinda like a punchbowl!  Here’s the mold we used: mini Kugelhopf mold

Prepare the mold by spraying lightly with PAM cooking spray, or wiping each mold cavity with a little vegetable oil.  Follow by wiping the mold with a clean paper towel.  This will leave the slightest reside which will aid in un-molding the gelatin without affecting the taste or appearance.

Begin by preparing the milk layer.

Milk layer

  • 2/3 cup water
  • 2 envelopes Knox gelatin
  • 1/2 can sweetened condensed milk (14 oz can)
  • 1/3 cup whipped cream flavored vodka
Pour water in a small saucepan, and sprinkle with the gelatin.  Allow to soak for a minute or two.  Heat over low heat until gelatin is dissolved, about 5 minutes.  Remove from heat and stir in the sweetened condensed milk.  Next, stir in the vodka. 

Transfer the mixture to a microwave safe bowl.  Spoon 1/2 cup of the condensed milk mixture into the mold.  Set the remaining mixture aside.  (Cover the bowl with the remaining milk mixture with foil and wrap a towel around it to further conserve heat and keep the mixture fluid.)

Place the mold in the refrigerator and chill until set (but slightly sticky when touched), about 30 minutes.

While the milk layer is chilling, prepare the orange layer


Orange Layer

  • 1/2 cup water
  • 1 envelope Knox gelatin
  • 1 box orange flavored gelatin dessert mix (sugar free dissolves faster!)
  • 1/2 cup whipped cream flavored vodka
Pour water in a small saucepan, and sprinkle with the Knox gelatin.  Allow to soak for a minute or two.  The mixture may be a little thick initially, but will loosen up.  Heat over low heat until plain gelatin is dissolved, about 5 minutes.  Add the orange gelatin dessert mix and stir until fully dissolved.  Remove from heat and stir in the vodka. 

Pour mixture into a small bowl and refrigerate until the mixture has cooled to room temperature - this will probably take 15-20 minutes. 

Ladle gently over the set white layer.  Return the mold to the refrigerator and chill until set (but slightly sticky when touched, about 25 minutes.

When the orange layer is set (but slightly sticky when touched), unwrap the bowl containing the milk gelatin mixture, and stir in a few drops of yellow food coloring.  If the mixture is clumpy, microwave it for 10-15 seconds (make sure it doesn’t get too hot, or it will melt the set gelatin and cook off the alcohol in the vodka).

Gently ladle all of the yellow mixture into the mold, over the set orange layer.  Refrigerate until fully set – at least  6 hours, or ideally overnight, so the layers can fully bond. 

To serve, unmold and place on a pretty plate.  Visit our tips page for unmolding instructions!  (If you are using a cake pan, just cut into desired shapes.  Ideally, cut just before serving – the taste of the jelly shots will evaporate through the cut edges.  I don’t know why, but this does seem to be the case!)  
More »

Tuesday, September 13, 2011

Spiked Rainbow Jelly Mold


Spiked Rainbow Jelly Mold . . . CHECK!  Anyone have a bunny, ducky or two?  


Is anyone else a bit low on their Recommended Daily Allowance of bunnies, duckies, and rainbows?  Or maybe its just me.  Hmmm.  I'm currently a bit short on bunnies and duckies, but to make up for it, here's my all time favorite rainbow jelly shot extravaganza ever - the Spiked Rainbow Jelly Mold, inspired by a classic dessert (iconic even!).
"Spiked" or "virgin", Spiked Rainbow Jelly Mold is nothing short of a tabletop showstopper!.  In my "gelatin cocktail" version of the classic, I used a blueberry flavored vodka in each layer- the fruit flavor was off the hook yummy, with all the sweet, creamy multi-hued goodness of the original.


XOXOX


Michelle 


Spiked Rainbow Jelly Mold

  • 4 1/2 cups boiling water, divided
  • 6 (85 g) packages gelatin dessert mix (rainbow colors – red/strawberry or cherry, yellow/lemon, orange, green/lime, blue/blue raspberry and purple grape)
  • 3 envelopes plain Knox gelatin (6 teaspoons of gelatin powder total)
  • 3 cups flavored vodka or rum, divided
  • 1 cup plus 2 tbsp vanilla yogurt, divided

Instructions:
Prep Time: 1 hr
Total Time: 4 1/2 hrs

Place the bottle of vodka in the freezer for several hours before beginning this recipe, to ensure potency!

Lightly spray bundt pan or gelatin mold with non-stick cooking spray.  Wipe off the excess spray with a paper towel.  A slight residue should remain, just enough to help unmold your gelatin, without affecting the taste or appearance.

Pour 3/4 cup water into a saucepan and sprinkle with 1 teaspoon of the plain gelatin.  Allow gelatin to soak for a minute or two.  Heat over low heat, stirring constantly, until gelatin is dissolved (about 5 minutes).  Wisk in the first package of flavored gelatin.  Whisk for at least 2 minutes, or until completely dissolved.  (I find the sugar free mix dissolves much faster than the regular!).

Remove from heat.  Add 1/2 cup of the cold liquor, and stir to combine.

Pour 3/4 cup of the gelatin mixture into the prepared mold, and place in refrigerator.  Allow to set for 20 to 30 minutes, until the gelatin is a little firm, but still sticks when touched.  Very important – if the layers set up too much, the next layer won’t bond appropriated. 

Refrigerate the remaining gelatin mixture in bowl about 5 minutes or until slightly thickened (consistency of unbeaten egg whites). Gradually stir in 3 tablespoons of yogurt and stir until well blended.  This cooling step is also important – the gelatin must be cooled to room temperature before adding on top of other layers, or the layers will not be well defined!

Gently spoon the gelatin/yogurt mixture over set gelatin and return to the refrigerator Refrigerate about 15 minutes or until gelatin is set but not firm (again, it should stick to finger when touched).  As the layers progress, the setting time will become shorter as the pan and gelatin becomes colder, and the layers become thinner as more layers are added to the mold.

Repeat steps with remaining gelatin flavors, for a total of 12 alternating clear and creamy gelatin layers.
After completing all the layers, refrigerate the gelatin overnight.  (This will allow the layers to fully bond!)  

To unmold, fill a larger container or clean sink with warm water (not too hot!).  With clean fingers, loosen the gelatin around the edges of the mold cavities.  Next, dip the mold almost to the edge into the warm water for just a few seconds (10 seconds worked for me). Dry the bottom of the mold with a towel and check the edges to see if they are loose, if not, repeat the dip for just a few seconds. Place your serving plate on top of the mold and invert.   Viola!

More »

Sunday, September 4, 2011

Rainbow Cake Jelly Shots


Rainbow Cake Jelly Shot.  Its all about the rainbows.  And PINK frosting.  Sprinkles don't hurt either. . .

Quick post.  Because the prescription for a long holiday weekend is indeed F-U-N, because I loves youse . . . and also because of this jelly shot's overwhelming adorableness was so excited to share this CAKE-inspired jelly shot.  Check it out - hope you enjoy!  

XOXOX Michelle


Rainbow Cake Jelly Shots

Ingredients:
  • ·         1 3/4 cups prepared lemonade
  • ·         4 envelopes plain gelatin
  • ·         1 1/4 cups cake flavored vodka (or sub vanilla or whipped cream vodka and a touch of amaretto)
  • ·         2 tsp sweetened condensed milk (up to 4 tbsp is okay - use to sweeten to taste!)
  • ·         6 small bowls (one for each color)
  • ·         liquid food coloring
  • ·         frosting and sprinkles, for garnish, if desired
  • ·         flexible silicone mini muffin pan (cavity volume = 3 tablespoons)

Instructions:
Prepare the mini muffin pans by spraying lightly with cooking spray and then wiping clean with a paper towel. (This will leave a slight residue which will assist in unmolding without effecting the taste or appearance of the jelly shots.)

Pour lemonade into a small saucepan and sprinkle with gelatin. Allow to soak for a minute or two. Heat over low, stirring constantly, until the gelatin is dissolved (about 5 minutes).

Remove from heat, stir in the vodka and sweetened condensed milk.

Divide into 1/2 cup portions and pour into 6 separate bowls. Use liquid food coloring for rainbow colors (in this case: red, orange, yellow, green, blue, violet). (I wanted a very vibrant rainbow, so used 4 drops of liquid food coloring for each color. Feel free to amp up the food coloring as necessary.)

Spoon 3/4 teaspoon of the red gelatin mixture into the muffin pan cavities. Refrigerate until set, but still sticky when touched. (The first layer will take 20 minutes or so, subsequent layers will take less time.) Repeat with remaining colors.

Refrigerate overnight to allow the layers to fully bond.

To serve, loosen around the edges of each muffin cavity and pop out the jelly shots.
Immediately before serving, garnish with a small dollop of frosting and sprinkles (yeah baby!) if desired.


More »

Friday, August 26, 2011

Fire Breathing Dragons . . .


It's a little bit Spicy, it's a little bit Sweet . . . its Marie Osmond a Fire Breathing Dragon Jelly Shot!

Hello at long last.  I hope you all aren't too cross with me for lack of posting - have missed all of you terribly.  I was hoping to pin my lack of posting on Intern Doug and his maniacal-ly chaotic ways, but that would be wrong, wouldn't it?  Isn't that how things go in Corporate America?  Praise moves up the chain, and blame goes down?  Or do I have that wrong.  Oh well.


To depart for a moment from my limited grasp of corporate lore and vernacular (as well as my inappropriate, incorrect and unforgivable blame-shifting to staff), I thought I would share a little Miami-glam gem whipped up for the Miami New Times (click here for the full article).  Its a little bit sweet, and little bit SPICY - just like Intern Doug.  (Just kidding Doug!  We all know that you are a very dedicated and talented gelatin professional, and I for one greatly enjoyed your solo posts - the recipes and photos were divine!)  

Hope you all enjoy the Fire Breathing Dragon!  I am thinking that one could use jalapeno vodka in this recipe, and omit infusing with fresh jalapeno, however weighing the cost of a pepper versus a bottle (not to mention the shelf space) infusing seemed the way to go.

Cheers and XOXOXOX,

Michelle

P.S.  Cake Month I promised, and Cake Month you shall have.  New recipes to follow next week!  XO.


Fire Breathing Dragon (inspired by the Doraku restaurant cocktail in South Beach, FL)
The recipe below uses a standard non-reactive glass or metal loaf pan (about 4" x 8").  Click here (under Ensuring a Good Impression) for instructions on silicone molds!
  • 2/3 cup mango vodka
  • 1/8 inch thick slice of fresh jalapeno pepper (with seeds)
  • 2/3 cup mango juice blend (used Ceres)
  • 2 envelopes plain gelatin
  • 2/3 cup peach schnapps

In a mixing glass, lightly muddle the jalapeno with the vodka.  Set aside.

Pour the mango juice into a saucepan and sprinkle with the gelatin.  Allow to soak for a minute or two.  Heat on low, stirring constantly, until the gelatin is dissolved (about 5 minutes).  Remove from heat.

Strain the vodka through thoroughly to remove any seeds, and add to the gelatin mixture with the schnapps.  Stir well. 

Pour into loaf pan or molds.  Refrigerate until fully set (several hours or overnight).  To serve, cut into desired shapes (or unmold).  Pin an orchid behind your ear and enjoy a jelly shot!
  
More »

Thursday, August 4, 2011

Rock Candy Jelly Shooters


What this fine country needs is more rock candy and jelly shots .... 
a big rock candy jelly shot mountain!

Happy [belated] July 4th! Without further audieu, a few shout outs. First, thanks to the ever divine Baker Royale for her adorable and highly inspirational Midori Sour Rock Candy Jelly Shots. Secondly, a shout out to Tablespoon.com, where this recipe first appeared!

Hope you enjoy!

XO Michelle


Rock Candy Jelly Shooters

Ingredients:
  • 1 3 oz box strawberry gelatin dessert
  • 1 3 oz box berry blue gelatin dessert
  • 3 cups water
  • 6 envelopes plain gelatin (I used Knox, each envelope contains about 2 tsp gelatin powder)
  • 1/2 cup sweetened condensed milk
  • 2 1/2 cups ice cold fruit-flavored vodka or rum (use your favorite)

You’ll need: lollipop sticks, 4 loaf pans, 3 heat-safe bowls, cooking spray, a sharp knife

Grab 3 heat-safe bowls. Pour each of the gelatin dessert mixes into two of the bowls and set aside.

Pour the water into a medium saucepan. Sprinkle with the 6 envelopes of plain gelatin. Allow to soak for a minute or two.

Heat over medium low heat, stirring constantly, until the gelatin is fully dissolved (about 5 minutes).

Pour one cup of the plain gelatin mixture into the bowl containing the strawberry gelatin mix. Stir for two minutes, or until the red gelatin is dissolved. Repeat process with the blue gelatin. Add one cup of the vodka or rum to each bowl, stir well, and set aside.

Pour the sweetened condensed milk into the saucepan containing the rest of the clear gelatin mixture. Add 
1/2 cup of the vodka or rum and stir well to combine.

Lightly spray 4 1 lb loaf pans (about 8" x 5") with cooking spray. Wipe out with a paper towel.

Pour 3/4 cup of the red gelatin mixture into one of the prepared loaf pans. Repeat with 3/4 cup of the blue gelatin mixture. Divide the white gelatin between the remaining two pans. Place all the pans in refrigerator until the gelatin is set (at least an hour).

Cover the remaining liquid gelatins (to keep them warm and pliable) and set aside.

When the pans of gelatin have set, dice the gelatin into small cubes. (You can cut the gelatin right in the pan).

Mix the diced gelatin and divide as desired between two of the loaf pans. (I had two pans that were predominantly blue, and two that were predominantly red cubes.)

Grab the liquid gelatin (if it is starting to set up, microwave for 10 to 15 seconds - just long enough to make it liquid again, but not hot). Pour the liquid gelatin, red in one pan, and blue in the other, to fill about 3/4 of the way up the gelatin cubes. (You may have a little gelatin left over.) Return pans to refrigerator and allow to set for several hours or overnight.

Remove pans from the fridge. Cut around the edges of the pan, and invert the gelatin slabs onto a non-stick surface for cutting.

Cut the gelatin into 3/4 to 1" zig-zaggy strips, wiggling your knife to give an uneven edge (like rock candy). If you cut the strips too thin, they will break when skewered.

Skewer each strip with a lollipop stick - hold the gelatin gently at the sides, and insert the stick almost all the way to the top. Place on a non-stick cookie sheet and chill until ready to serve!
More »

Monday, August 1, 2011

Birthday Cupcake Jelly Shot


Birthday Cupcake Jelly Shot, anyone?  Make a wish!!!  
Oh, wait . . . no candles.  Sorry!  They melt the jelly shots.  Cancel that. . . 

And, well, it IS my birthday . . . ahem . . .later this week.  Because of this, as well as the release of UV Vodka's "white cake" flavor, I am declaring August as "Cake Month" at JSTK.
So, to be clear, the "Cake" designation is not solely due to my personal high maintenance issues and ongoing quest to turn my birthday into a double-fortnight holiday - it also happens to coincide with product release.  So, clearly, it is due to circumstance AS WELL AS vanity.  So much better!

Our first cake concoction is patterned after the Birthday Cake Cocktail, topped with whipped cream and a bazillion (or three - flowers, rods and tiny cirles) types of sprinkles to make a tiny bite-sized cupcake of a jelly shot.  "Why so many sprinkles," one might ask.  "Did the Sprinkle Factory blow up inside the Test Kitchen?"  In addition to the inevitable birthday adrenaline, it was admittedly my first time out with a pastry bag and tip.  The results weren't pretty.  Or, for that matter, ever remotely symmetrical.  The rainbow magic of several types/layers of multi-colored sprinkles both distracts the eye and tames the wily whip to somewhat more visually pleasing proportions.

And there you have it!  The Birthday Cupcake Jelly Shot!  Hope you enjoy!

XO Michelle


Birthday Cupcake Jelly Shots

Recommended Pan:  Peanut Butter Cup flexible silicon mold (click here to buy the mold on Amazon)

Ingredients:
  • 2/3 cup canned pineapple juice (fresh won’t gel!)
  • 2/3 cup cranberry juice cocktail
  • 1 tbsp heavy cream
  • 2-3 envelopes plain gelatin (your call, but use 3 if the jelly shots will be sitting out for a while, at your birthday party)
  • 2/3 cup white cake flavored vodka
  • Whipped cream and multi-colored sprinkles, for garnish, if desired

Prepare the silicone mold.  Lightly spray mold with non stick cooking spray.  Wipe off the excess spray with a paper towel.  A slight residue should remain, just enough to help unmold the gelatin, without affecting the taste or appearance.

Pour the juices and cream into a saucepan and sprinkle with gelatin.  Allow to soak for a few minutes.  Heat on low, stirring constantly, until gelatin is fully dissolved (about 5 minutes).  Remove from heat. 

Stir in the vodka.  Pour into the molds, and chill until set, several hours or overnight.

To serve, unmold the jelly shots.  Pipe on whipped topping with a pastry bag.  Refrigerate until serving time.  Immediately before serving, top with the sprinkles. 

Makes 30 jelly shots.
More »

Wednesday, July 27, 2011

Summer Ginger Smash


Summer Ginger Smash - the best cocktail ingredients, including fancy rum and 
maraschino liqueur, held together with the barest smattering of mixers.  

I am away this week, so Intern Doug is manning the Test Kitchen solo . . . or so I thought.  Apparently, Intern Doug has been doing some hiring in my absence!  I was not sure whether to be proud of his initiative or frightened by his bold staffing moves until I saw Summer Ginger Smash -
the super fab pineapple and rum infused collaboration with new Assistant Intern James!  Well, perhaps its time to slacken Intern Doug's leash a notch.  (Oh, and lest I forget, welcome aboard Asst. Intern James!!)


Thanks guys for the hard work, wonderful recipe and beautiful photo!  (oh, and, Doug, I'll see you in my office upon my return . . .)


XO Michelle


P.S.  The cocktail inspiration for this jelly shot was taken from a recipe in the gorgeous and inspiring

Speakeasy: The Employees Only Guide to Classic Cocktails Reimagined - a book we Love Love Love, and also adore.  


Summer Ginger Smash

A quick word from Intern Doug: I enlisted brand-spanking-new Assistant Intern James to craft this delectable delight.  Finding exactly the right ingredients and quantities for this jelly shot proved to be quite challenging.  However, after much perseverance, we are proud to bring this Ginger Smash recipe to the Jelly Shot Test Kitchen.

Difficulty:  Moderate

Recommended Pan:  1-pound loaf pan (approximately 8” x 4”/20 x 10 cm)

Implements:  Muddler

Ingredients
  • 1/8 cup canned pineapple juice (fresh pineapple juice won’t gel)
  • 1/4 cup Bakers Ultrafine Sugar
  • 12 thin slices of Ginger Root
  • 1/2 cup water
  • 1/4 cup lime juice
  • 2 envelopes Knox gelatin
  • 1/4 cup Maraschino Liquor
  • 1/4 cup Apfel – German Apple Schnapps
  • 3/4 cup 10 Cane Rum
  • Thin sliced Pineapple and crystalized Ginger strips for garnish, if desired (recipe below)


Cut 12 thin slices of ginger root and muddle with 1/4 cup of Maraschino liquor and strain.   Add the Apfel and 10 Can Rum and set aside.  Pour water, canned pineapple juice (fresh won’t gel), lime juice and sugar into a small saucepan and sprinkle with the gelatin. Allow the gelatin to soak for a minute or two. Heat over very low heat until gelatin is dissolved, stirring constantly, about 5 minutes. Remove from heat.  Add the Maraschino muddled mix, Apfel and Rum and stir into the gelatin mixture. Pour mixture into loaf pan or molds. Place in refrigerator to set (several hours or overnight).

To serve, cut into desired shapes.  Garnish with thin slices of crystallized Ginger strips if desired.

Makes 18 to 24 jelly shots.
More »

Thursday, July 14, 2011

"Polyjuice Potion" Jelly Shots


Polyjuice Potion Jelly Shots are creepy, spooky Potter-rific fun . . .

Another Potter-themed jelly shot for you!  These slightly creepy gelatin extravaganzas are made with pineapple juice, pineapple vodka, ginger ale and lime sherbet.
(To make for the kids, just omit the vodka and replace with additional soda or juice.)  Partially setting the gelatin mixtures partially set before adding to the pan provides a ghastly bubbly-potion effect.

Happy Pottering!

XO Michelle

Polyjuice Potion Jelly Shots

Ginger Ale mixture
1/2 cup ginger ale
1 envelope plain gelatin
1/2 cup ginger (or pineapple) vodka

Pineapple mixture
1/2 cup canned pineapple juice (fresh won't work - the enzymes in fresh pineapple interfere with the gelatin)
1 envelope plain gelatin
1/2 cup pineapple vodka

Lime mixture
1/2 cup water
1 envelope plain gelatin
1/2 cup lime sherbet, melted

Prepare the three gelatin mixes as follows:
  • Ginger Ale: Pour the ginger ale in a medium saucepan.  Sprinkle with the gelatin and allow to soak for a minute or two.  Heat over low heat, stirring constantly, until the gelatin is fully dissolved (about 5 minutes).  Remove from heat.  Stir in the vodka.  
  • Pineapple: Pour the pineapple juice in a medium saucepan.  Sprinkle with the gelatin and allow to soak for a minute or two.  Heat over low heat, stirring constantly, until the gelatin is fully dissolved (about 5 minutes).  Remove from heat.  Stir in the vodka.  
  • Lime: Pour the water in a medium saucepan.  Sprinkle with the gelatin and allow to soak for a minute or two.  Heat over low heat, stirring constantly, until the gelatin is fully dissolved (about 5 minutes).  Remove from heat.  Stir in the melted sherbet.

Pour each mixture into a separate bowl and refrigerate until partially set.  (Just starting to change from liquid to solid - about 20 to 25 minutes.)

Prepare a standard 1lb loaf pan about 8" x 5", glass or non-reactive metal) by spraying with a little cooking spray and then wiping out with a paper towel.

Give each mixture a quick stir.  Drop alternating spoonfuls of the three mixtures into the pan, until all the gelatin has been transferred.  Refrigerate until fully set (at least 6 hours or overnight - extra time is needed for the gelatins to bond)

To serve, cut into rectangles.  Makes about 18 jelly shots.
More »

Tuesday, July 12, 2011

"Chocolate Frog" Jelly Shots


"Chocolate Frog" Jelly Shots, preparing to hop off the tray. . . 


Just a tiny bit of Potter-inspired jelly shotting for you today.  The recipe is a variant of the Bushwacker . . . very chocolatey though and missing the coconut.  (Link for the delightfully creepy frog molds . . . )

For more Potter-rific fun (and you know you want it) see:


(AND, depending on how R&D goes today, it is possible I may have one more Potter-esque jelly shot trick up my sleeve for you!)

XO, Michelle

Chocolate Frog Jelly Shots

Ingredients:
  • 1/2 cup water
  • 2 envelopes Knox gelatin
  • 3/8 cup vanilla ice cream, melted
  • 1/2 cup chocolate liqueur
  • 1/4 cup Bailey’s
  • 1/4 cup vodka
  • 1/8 cup amaretto

Directions: 

Prepare the molds with a light application of cooking spray.  Wipe the cavities clean with a paper towel.  This will leave a very slight residue which will aid in unmolding without affecting taste or appearance.  

Pour water in saucepan, sprinkle with gelatin.  Allow gelatin to soak for a few minutes.  Heat over very low heat until gelatin is dissolved, stirring constantly (approximately 5 minutes).  Add the melted ice cream.  Once combined, stir in vodka and the liqueurs.

Pour mixture into molds (or standard glass or non-reactive metal 1 lb loaf pan approximately 8” x 4” will work!).  Refrigerate until fully set (several hours or overnight).

To unmold, fill a larger container or clean sink with warm water (not too hot!).  With clean fingers, loosen the gelatin around the edges of the mold cavities.  Next, dip the bottom of the mold into the warm water for just a few seconds (10 seconds worked for me). Dry the bottom of the mold with a towel and check the edges to see if they are loose, if not, repeat the dip for just a few more seconds. Place a nonstick cookie sheet on top of the mold and invert.  The gelatin frogs should drop right out.  Return the “frogs” to refrigerator until immediately before serving.
  
More »

Tuesday, July 5, 2011

Orange Meringue Jelly Shots


The Orange Meringue Jelly Shot, Intern Doug's first solo creation!  
(Bravo, sir . . . three cheers and a TIGER for you!)

This is my first solo blog post! I just love my job. Michelle asked me to create a new Jelly Shot and there is just nothing more satisfying and fun than crafting a medley of ingredients that tastes and looks fabulous. I was especially pleased with how well the Orangecello and Countreau mixed so smoothly and created such a surprisingly deep range of orange flavors.
So here it is. I really hope you enjoy it!

Also, thank you for the wonderful reviews of the Jelly Shot Test Kitchen recipe book on Amazon. The support is appreciated so much!

Intern Doug

Orange Meringue Jelly Shots

Inspired by the much loved Lemon Meringue recipe (found in the JSTK recipe book) and Lemoncello’s sister drink Orangecello.  Combining the orange flavor of Orangecello with Countreau provides a wonderful depth of orange flavor.


Difficulty: Easy

Recommended Pan: 1-pound loaf pan (approximately 8” x 4”/20 x 10 cm)

Ingredients

  • 1 cup orangecello liqueur
  • 1/2 cup citrus-flavored (or Citron) vodka
  • 1/2 cup cointreau
  • 2 envelopes Knox gelatin
  • For garnishment, 1 tsp chopped orange zest combined with 1 tbsp orange sugar, if desired 


Pour the Orangecello into a medium saucepan and sprinkle with gelatin. Allow the gelatin to soak
for a minute or two. Heat over very low heat until gelatin is dissolved, stirring constantly, about 5
minutes. (Take care to use very low heat to avoid overheating the alcohol.) Remove from heat. Add
the couintreau and the vodka and stir into the gelatin mixture. Pour mixture into loaf pan or molds.
Place in refrigerator to set (several hours or overnight).

To serve, cut into desired shapes. Garnish with the orange zest/sugar mixture if
desired.

Makes 18 to 24 jelly shots.
More »

Thursday, June 30, 2011

Fruited Champagne Jelly Shot


Fruited Champagne Jelly Mold simply SHRIEKS patriotic fervor -
 in the subtlest, most dignified manner imaginable . .  .

So, the second July 4th Party is a bit of a fancier affair.  Not that the variegated display of gelatinized patriotism concocted for Party #1 would  be un-welcome at this event.  We just wish to pull out our culinary stops in a somewhat more restrained manner
, as the guest of honor will be none other than the supremely dashing Mr. M., who has taken leave of his large, shaded patio in the south of France for an all-too-brief visit to the Midwest.

Fruited Champagne Jelly Mold should be perfect - sounds kinda sophisticated, is light and refreshing for a hot afternoon, and is not, too too boozy (important for this event as the champagne will likely be flowing and Intern Doug will be shaking and pouring French 75s until his arms seize up.)  The internal garnish of fruit (red berries! blueberries!) provides venue for a discreet display of nationalist pride, without bonking anyone over the head with such.

Happy 4th of July everyone!!  Wherever you are, enjoy the fireworks, and have a jelly shot for goodness sake!  (And welcome back to the prairie Mr. M. - it has been far too long and we have missed you terribly!!)

XOXOX

Michelle


Fruited Champagne Jelly Shot Mold

Implements:  3 cup non-stick mini-bundt pan (this is the one I used)

Ingredients:
  • 3 cups champagne, sparkling wine or prosecco (divided)
  • 4 tbsp. sugar
  • 4 envelopes Knox gelatin
  • 1/2 cup peach schnapps
  • 1/2 cup fresh blueberries
  • 8-10 large strawberries, sliced

Lightly spray bundt pan with cooking spray.  Wipe off the excess with a paper towel.  A slight residue should remain, just enough to help unmold your gelatin, without affecting the taste or appearance.

Pour 1 cup of the champagne and the sugar into a medium saucepan.   Sprinkle with the gelatin allow to soak for a minute or two. Heat over low heat, stirring constantly, until the gelatin is dissolved (about 5 minutes).  Remove from heat.  Stir in the rest of the champagne and the schnapps.

Pour 1 1/2 cups of the gelatin mixture into the prepared mold.  Refrigerate until the gelatin is the consistency of egg whites (15 to 20 minutes).  Stir in the blueberries and return to the refrigerator for 5 minutes.  Place the sliced strawberries on top of the blueberry/gelatin layer, pouring a bit of liquid gelatin in over each layer, until the mold is full.  (You may have a bit of gelatin left over.)  Refrigerate until fully set (several hours or overnight).

To unmold, fill a larger container or clean sink with warm water (not too hot!).  With clean fingers, loosen the gelatin around the edges of the mold.  Next, dip the mold almost to the edge into the warm water for 10 seconds. Dry the bottom of the mold with a towel.  Place your serving plate on top of the mold and invert.  The gelatin should pop out.  If not, return the mold to the warm water bath and repeat.  

More »

Friday, June 24, 2011

July 4th Variegated Jelly Shot


July 4th Jelly Shot Mold - a punch bowl in solid form.   
And variegated patriotic colors!  Wheee!
All it needs is sparklers and wheels!  

Hello all, just a quick note and a fun July 4th themed recipe!  I will be attending several different events this year, and will of course be bringing jelly shots.  The events range from casual and fun to a little fancier, and so will the jelly shots.


Hope you enjoy the first installment of a Jelly Shotting July 4th!  I am absolutely mad for the whole variegated color scheme . . . and don't get me started on molds - so fun! A punch bowl in solid form!  Wheee!

XO Michelle

P.S. To make a kid-friendly version, just swap out the booze for flat lemon-lime soda, or even plain water! 


July 4th Variegated Jelly Shot Mold

Blue Layer
2 boxes berry blue gelatin dessert mix (3.1 oz)
1 1/2 cups water
2 envelope plain gelatin
1 cup flavored rum or vodka

Red Layer
2 boxes raspberry, strawberry or cherry gelatin dessert mix (3.1 oz)
1 1/2 cups water
2 envelope plain gelatin
1 cup flavored rum or vodka

White Layer
2 ¾ cups water
6 envelopes plain gelatin
3/4 cup sweetened condensed milk
1 cup flavored rum or vodka
1/2 cup white crème de cacao (or white chocolate liqueur)

Directions:
Lightly spray  bundt pan or gelatin mold (10 cup volume) with non stick cooking spray.  Wipe off the excess spray with a paper towel.  A slight residue should remain, just enough to help unmold your gelatin, without affecting the taste or appearance.

Have 9 clean bowls ready to prepare your layers. 

Prepare the red and blue layers, in separate pans.  Pour the gelatin dessert mix into medium-sized bowls.  Pour the water in a small saucepan, and sprinkle each with the envelope of plain gelatin.  Allow to soak for a minute or two.  Heat over low heat, stirring constantly, until the gelatin is dissolved (about 5 minutes).  Pour the warm water/gelatin mixture into the bowls containing the gelatin dessert mix.  Stir until dissolved (about 2 minutes each).  Remove from heat.  Pour in the liquor, and stir well.  Set aside and prepare the white gelatin.    

For the white gelatin, pour the water into a saucepan and sprinkle with the 6 envelopes of plain gelatin.  Allow to soak for a minute or two.  Heat over low heat, stirring constantly, until the gelatin is dissolved (about 5 minutes).  Stir in the sweetened condensed milk.  Remove from heat, and stir in the liquors.  Set aside. 

Grab the 9 clean bowls, and prepare the layers by mixing gelatin as shown in the chart below. 

Layer
Mixture
1
1 ½ cups blue
2
2/3 cup blue & 1/3 cup white
3
1/3 blue & 2/3 white
4
1 cup white & 1 tbsp blue
5
1 cup white
6
1 cup white & 1 tbsp red
7
1/3 cup red & 2/3 cup white
8
2/3 cup red & 1/3 cup white
9
Remaining red gelatin

Add the first layer to the prepared mold.  refrigerate about 15 minutes or until gelatin is set but not firm (it should stick to finger when touched.)  Gently spoon the gelatin for the next layer over the set gelatin, and return the pan to the refrigerator for about 15 minutes.  As the layers progress, the setting time will become shorter as the pan and gelatin becomes colder, and the layers become thinner as more are added to the mold.

Repeat steps with remaining gelatin layers, for a total of 9 layers.  If you find the gelatin is setting up before its ready to go in the mold, just microwave for 5 to 10 seconds and stir well before adding to the mold. 

After completing all the layers, refrigerate the gelatin overnight.  

To unmold, fill a larger container or clean sink with warm water (not too hot!).  With clean fingers, loosen the gelatin around the edges of the mold cavities.  Next, dip the mold almost to the edge into the warm water for just a few seconds (10 seconds worked for me). Dry the bottom of the mold with a towel and check the edges to see if they are loose, if not, repeat the dip for just a few seconds. Place your serving plate on top of the mold and invert. 

Serves 24.


More »